-
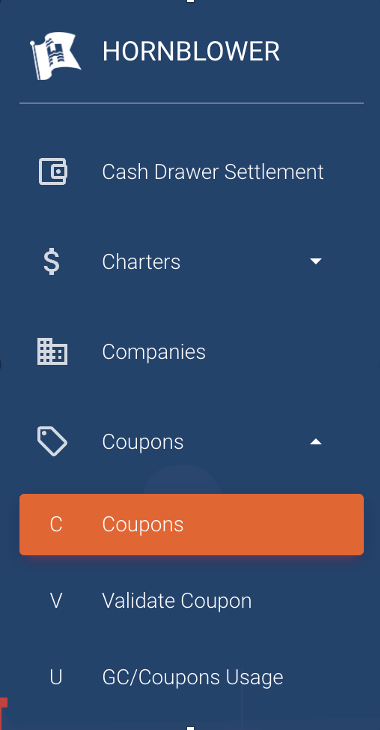
Click on Coupons in the left side rail.
-
Click ADD COUPON in the right-hand corner.

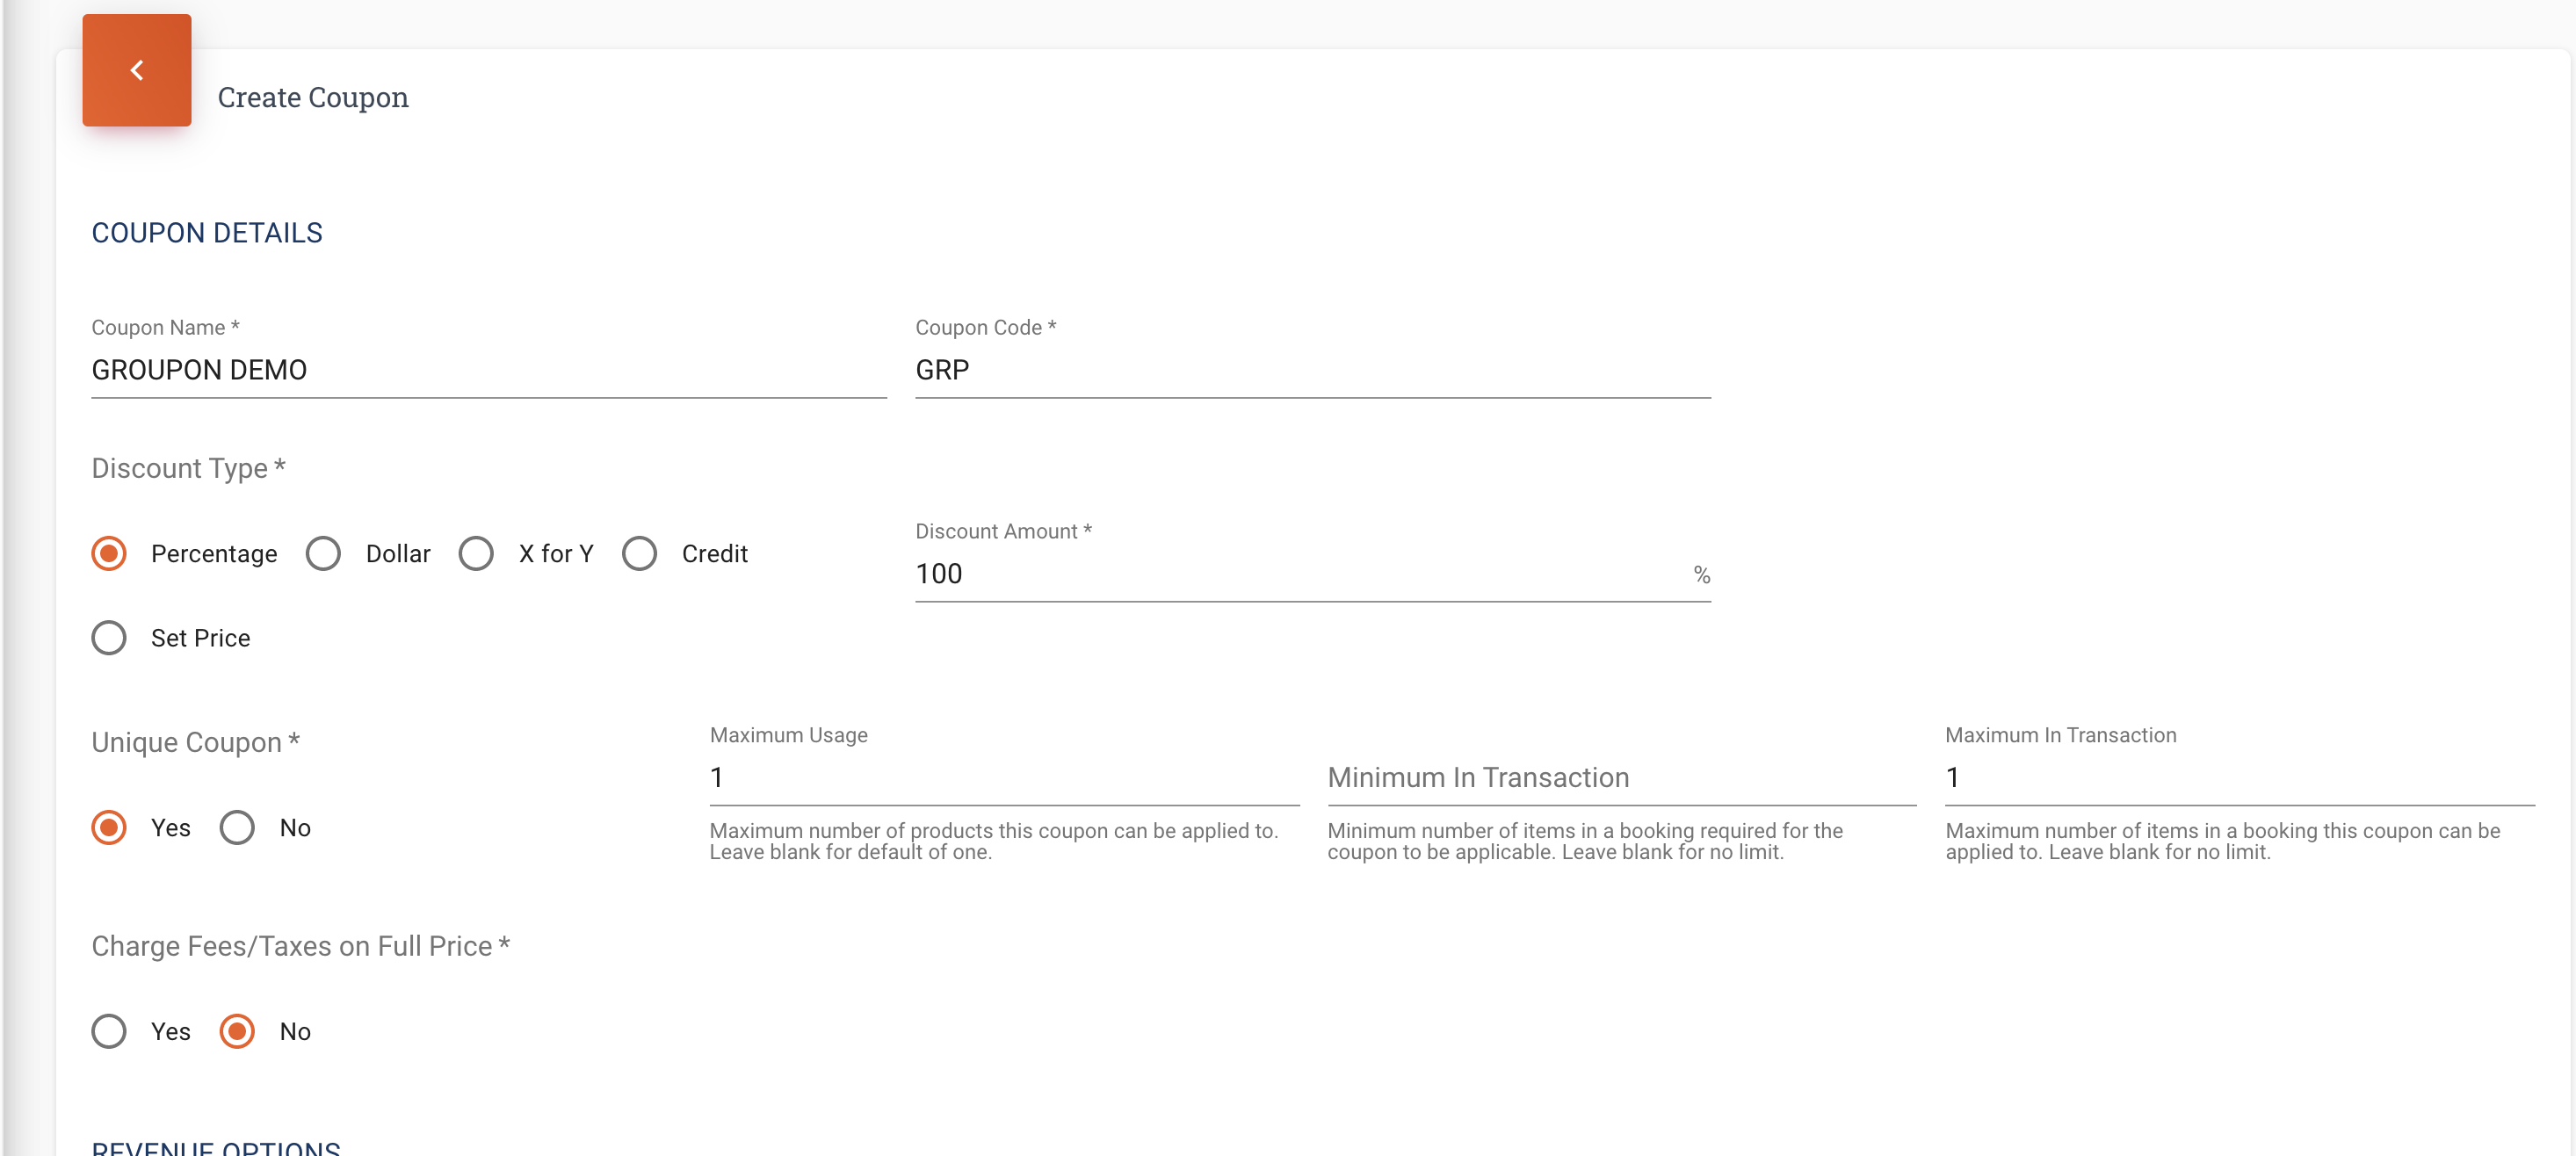
Coupon Name – Enter a name for the coupon. Keep in mind, this is the best place to offer some kind of description for the reason/purpose of the coupon. Example: “Facebook summer offer 2021”
Coupon Code – This code will be the prefix to the unique voucher code that the guest will use to type in & redeem at checkout. This field is not case sensitive.
When creating a Coupon or Promo Code, you can only use alpha numeric characters. No Special characters or spaces are allowed in your codes.
Discount Type
Indicate if this offer is Dollar or Percentage based
-
Percentage – % discount off the base price / Including 100% to offer a Complimentary ticket
-
Dollar – Fixed dollar amount off of the price of the ticket
Discount Amount – This is the amount that will be discounted off/reduced from the base price based on the discount type indicated
Unique Coupon – Enter YES. This is a unique coupon which will allow only a single (/specified) usage
Maximum usage – This is the maximum number this coupon can be applied to -Think of this as the overall usage in the “lifetime” of the coupon. If left blank it will default to One (Most common) which will allow the code to only apply to one single guest.
If you are creating a Voucher “For Two” – This Maximum Usage Field should be set to 2 / If you are creating a Voucher “For Four” – This Maximum Usage Field should be set to 4, etc..
If you are creating a voucher which can be used on 10 tickets overall in it’s lifetime, this should be set to 10 (Max in transaction below will limit how many of those 10 can be used in 1 single order.)
Minimum in Transaction – Leave blank for no limit (Most Common). Minimum number of items in a booking required for the coupon to be applicable.
For Example, If the guest has to purchase at least 2 tickets to be eligible, you would enter 2 into this field.
Max in Transaction – Maximum number of items in a single order/booking this coupon can be applied to.
If you leave this section blank, all tickets will be discounted regardless of how many are purchased.
Most Common Scenarios:
If you are creating a Voucher “For One” – This Maximum in Transaction field should be set to 1
If you are creating a Voucher “For Two” – This Maximum in Transaction field should be set to 2
If you are creating a Voucher “For Four” – This Maximum in Transaction should be set to 4, etc..
(This number will not be able to exceed the overall Maximum Usage field)
If you are creating a voucher which has the overall Maximum Usage set to 10 (can be used 10 times overall in it’s lifetime) but it can only be used in increments of 2 guest per each individual order, you would set 2 in this Max in transaction field. **If you have a scenario such as this, please discuss with your Anchor Rep for assistance.
Note – If the booking contains more than the max, they will still be able to use the discount code, however the offer will only apply to the specified maximum tickets and the other tickets will be remain at full price.
Charge Fees/ Taxes on Full Price – Choose whether you want to charge taxes and fees on the full price or the discounted price. Most Common/Default is “NO” which will charge taxes/fees based on the new total after the discount is applied.
REVENUE OPTIONS
-
Discount Product
-
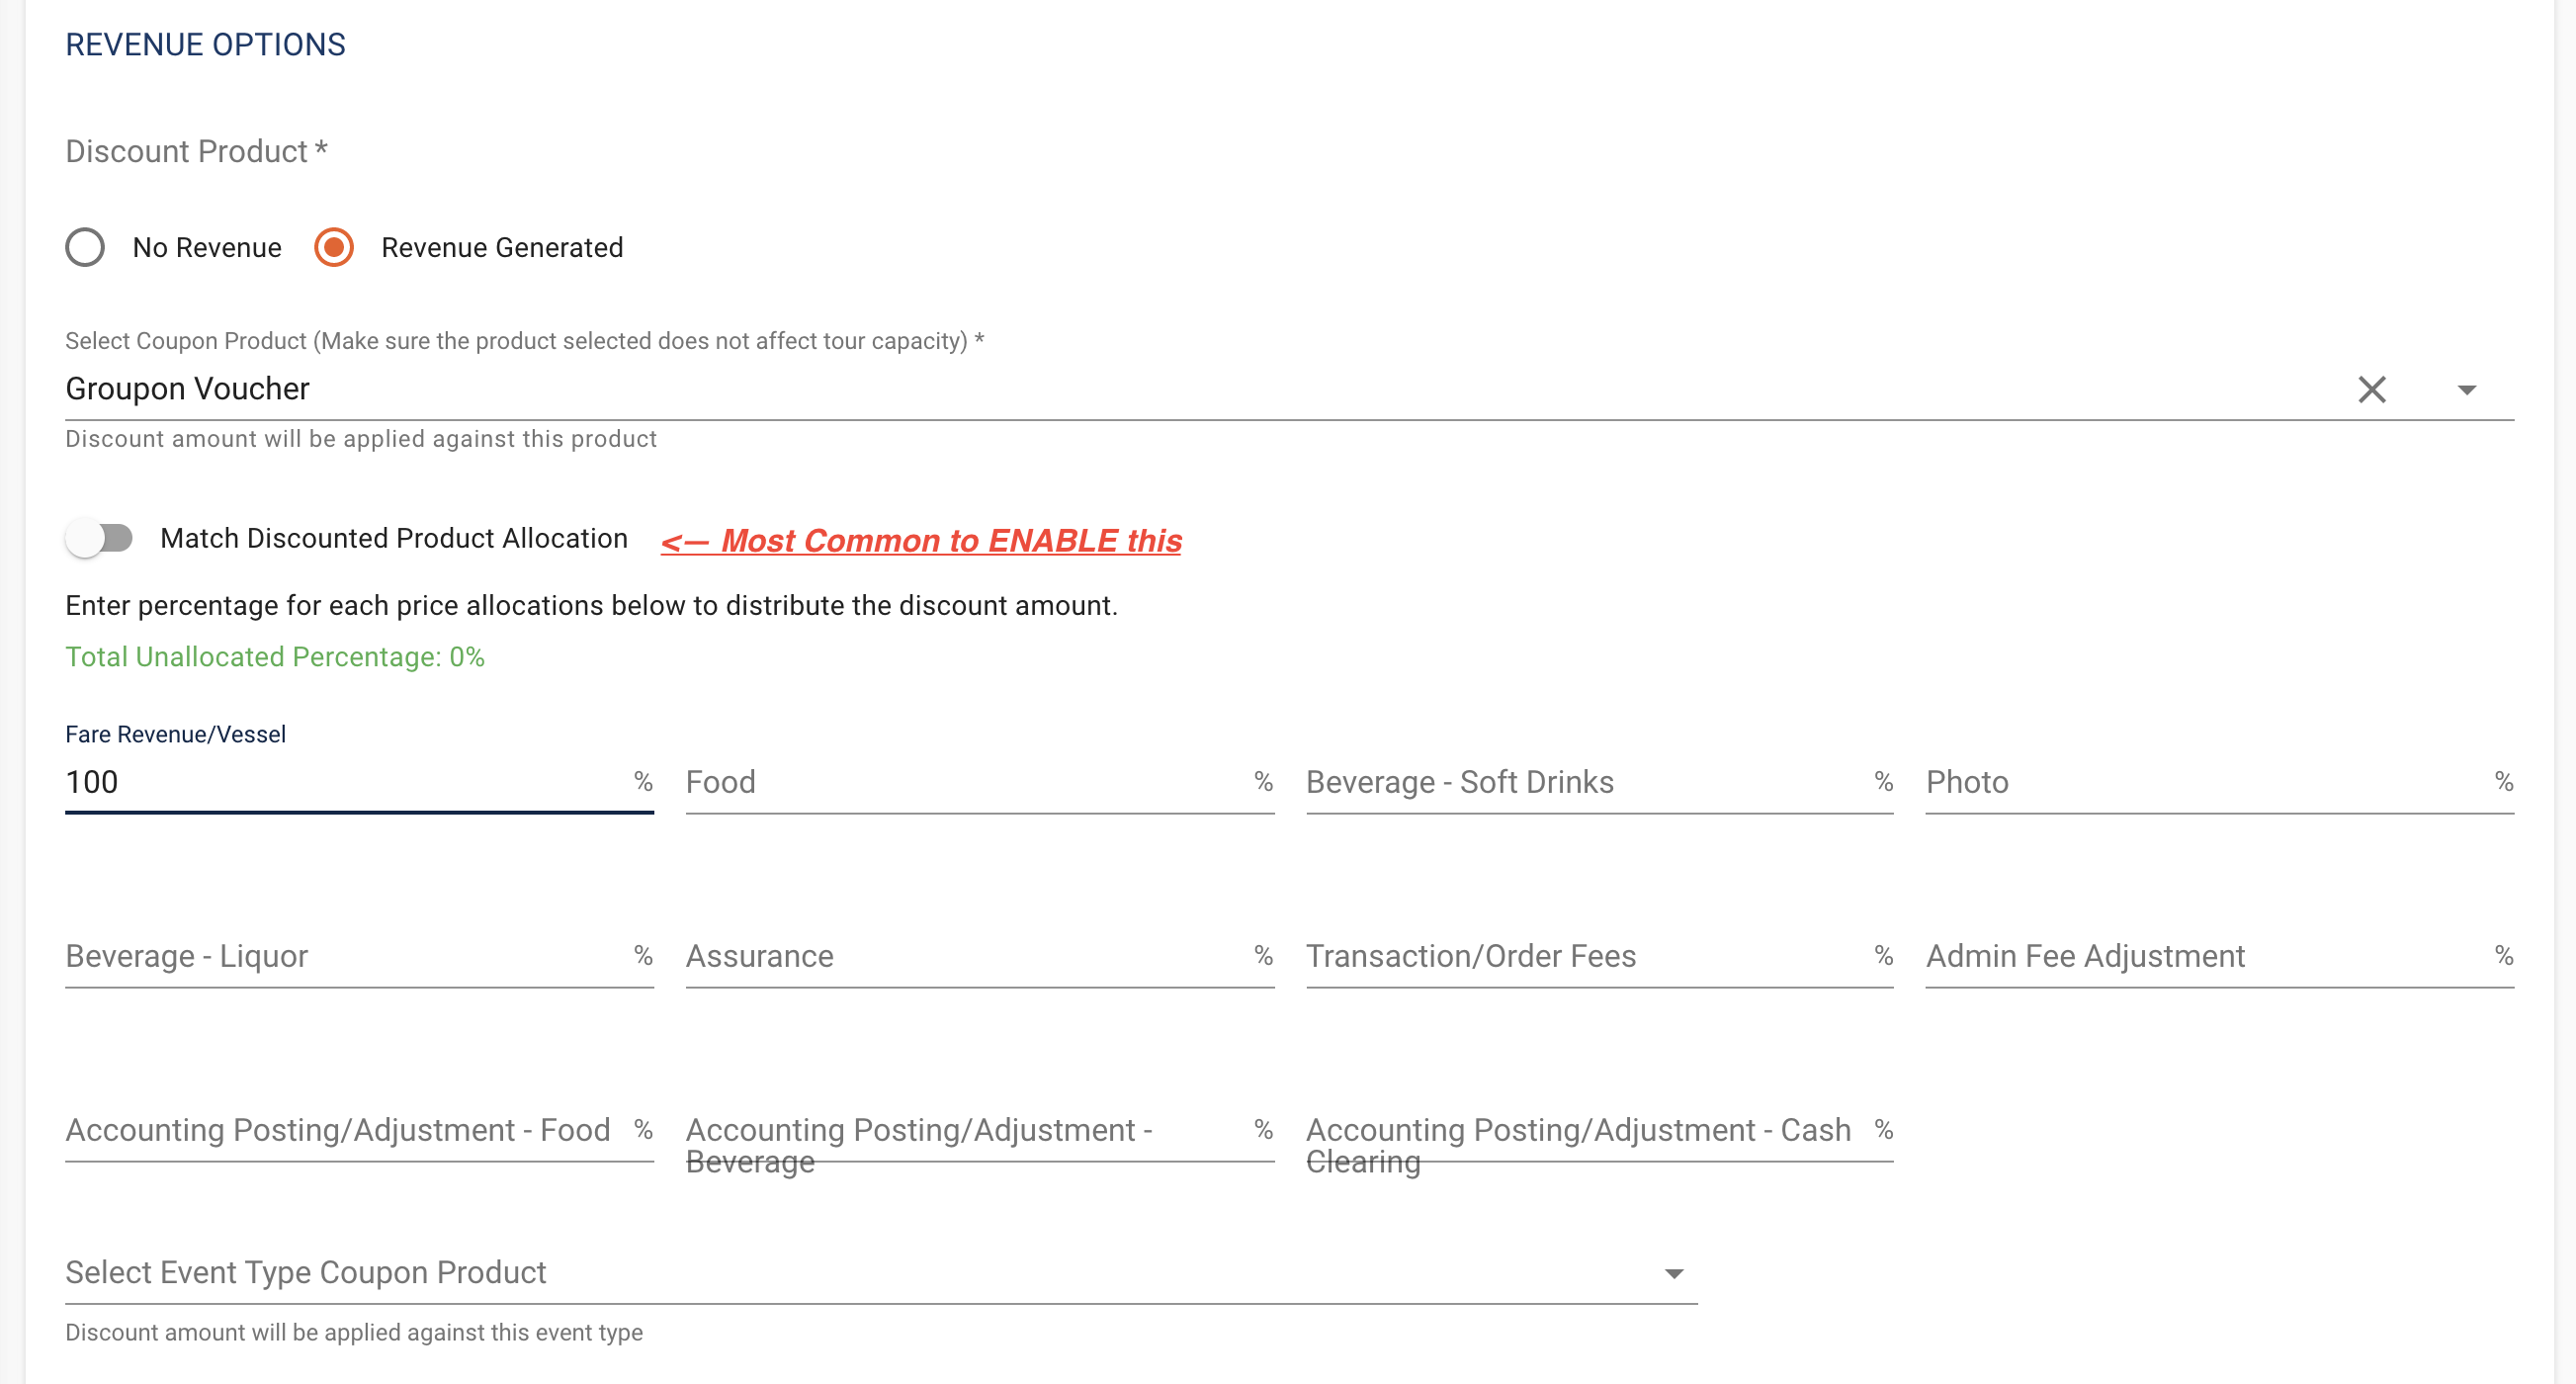
Revenue generated = This means that some revenue will be generated from the ticket after the coupon is applied. Even if the revenue is only $1 you should select this option. This option also applies to coupons such as Groupon Codes where you are going to discount the ticket for the guest upfront but invoice the company later for the revenue.
-
Select Coupon Product – This drop-down will show you the Coupon products that you have setup earlier in your Products section specifically for Coupons. It is a required field and you must select one of the options.
-
Coupon/Promo Code Applied is the most common Coupon Product options in this field.
-
If you do not see an option here, go back to these instructions for setting up a coupon product – LINK: One-Time Advanced Setup for Coupon Products
-
-
Ensure this Coupon Product is never included on your event builds as a true ticket
-
Match Discount Product Allocation
-
ON – (Most Common) When this is switched on, this will distribute the discounted amount evenly across all allocations that were included in the original ticket.
-
OFF – This will allow you to specify manually what portion of the discount you would like to reduce from each specific allocation.
-
INVOICE COMPANY – YES
Utilized when invoicing a company on the back-end whenever a coupon is redeemed. NOTE – the company must already exist in anchor under “Companies” Link: How to Create a Company in Anchor
-
Select Company – Select GROUPON because this is the company that you are going to be invoicing for this booking.
-
Enter the price allocation for the Invoice amount in the field below. This is a dollar amount and will be different for each coupon set up. The total of these values will be the amount that Groupon will be invoiced.

COUPON RULES
-
Applicable Tours – Select All of the experiences (ie. Dinner Cruise, Brunch Cruise) that the promo discount should be able to be applied to in checkout. As Tours are selected, they will show on the list in Bold to know which you have selected. Any Tour left off of this list will return an invalid error if the code is attempted at checkout.
-
Applicable Products – Add all of the ticket types (ie. Adult, Child, Senior tickets) to which the promo can be applied in the booking. Any tickets that are in the booking that are not included will be charged at full price. If no applicable tickets are present on the order, it will return an invalid error if the code is attempted at checkout.
-
Coupon valid if booked between dates – This setting allows you to specify a date range that the coupon is able to be used for a booking. This range is based on the booking date / Order Creation Date, not the experience date. Therefore guests will need to make the booking during this date range to get the discount, or they will be notified that it is invalid. This is not a required field but is recommended that you set some limits to your promotional codes.
-
Coupon valid for tours* Section
-
This section allows you to set specific date ranges or events that the coupon/promo can be used on.
-
Option #1 – By Date Range
-
Click and highlight the days of the week you want allow the discount.
-
Then, enter the Event Date ranges that the coupon is going to be valid. You can add multiple ranges if you wish, using “+ Add Event Valid Date Range”. The coupon codes will not work on any dates outside of these ranges.
-
-
-

-
Options #2 – Specific Events. Enter the date range for the events that you want to search and click SEARCH. A list of events will appear on the right side. Delete any events that you do not want the promo code to apply by clicking the trash can icon on the right.

-
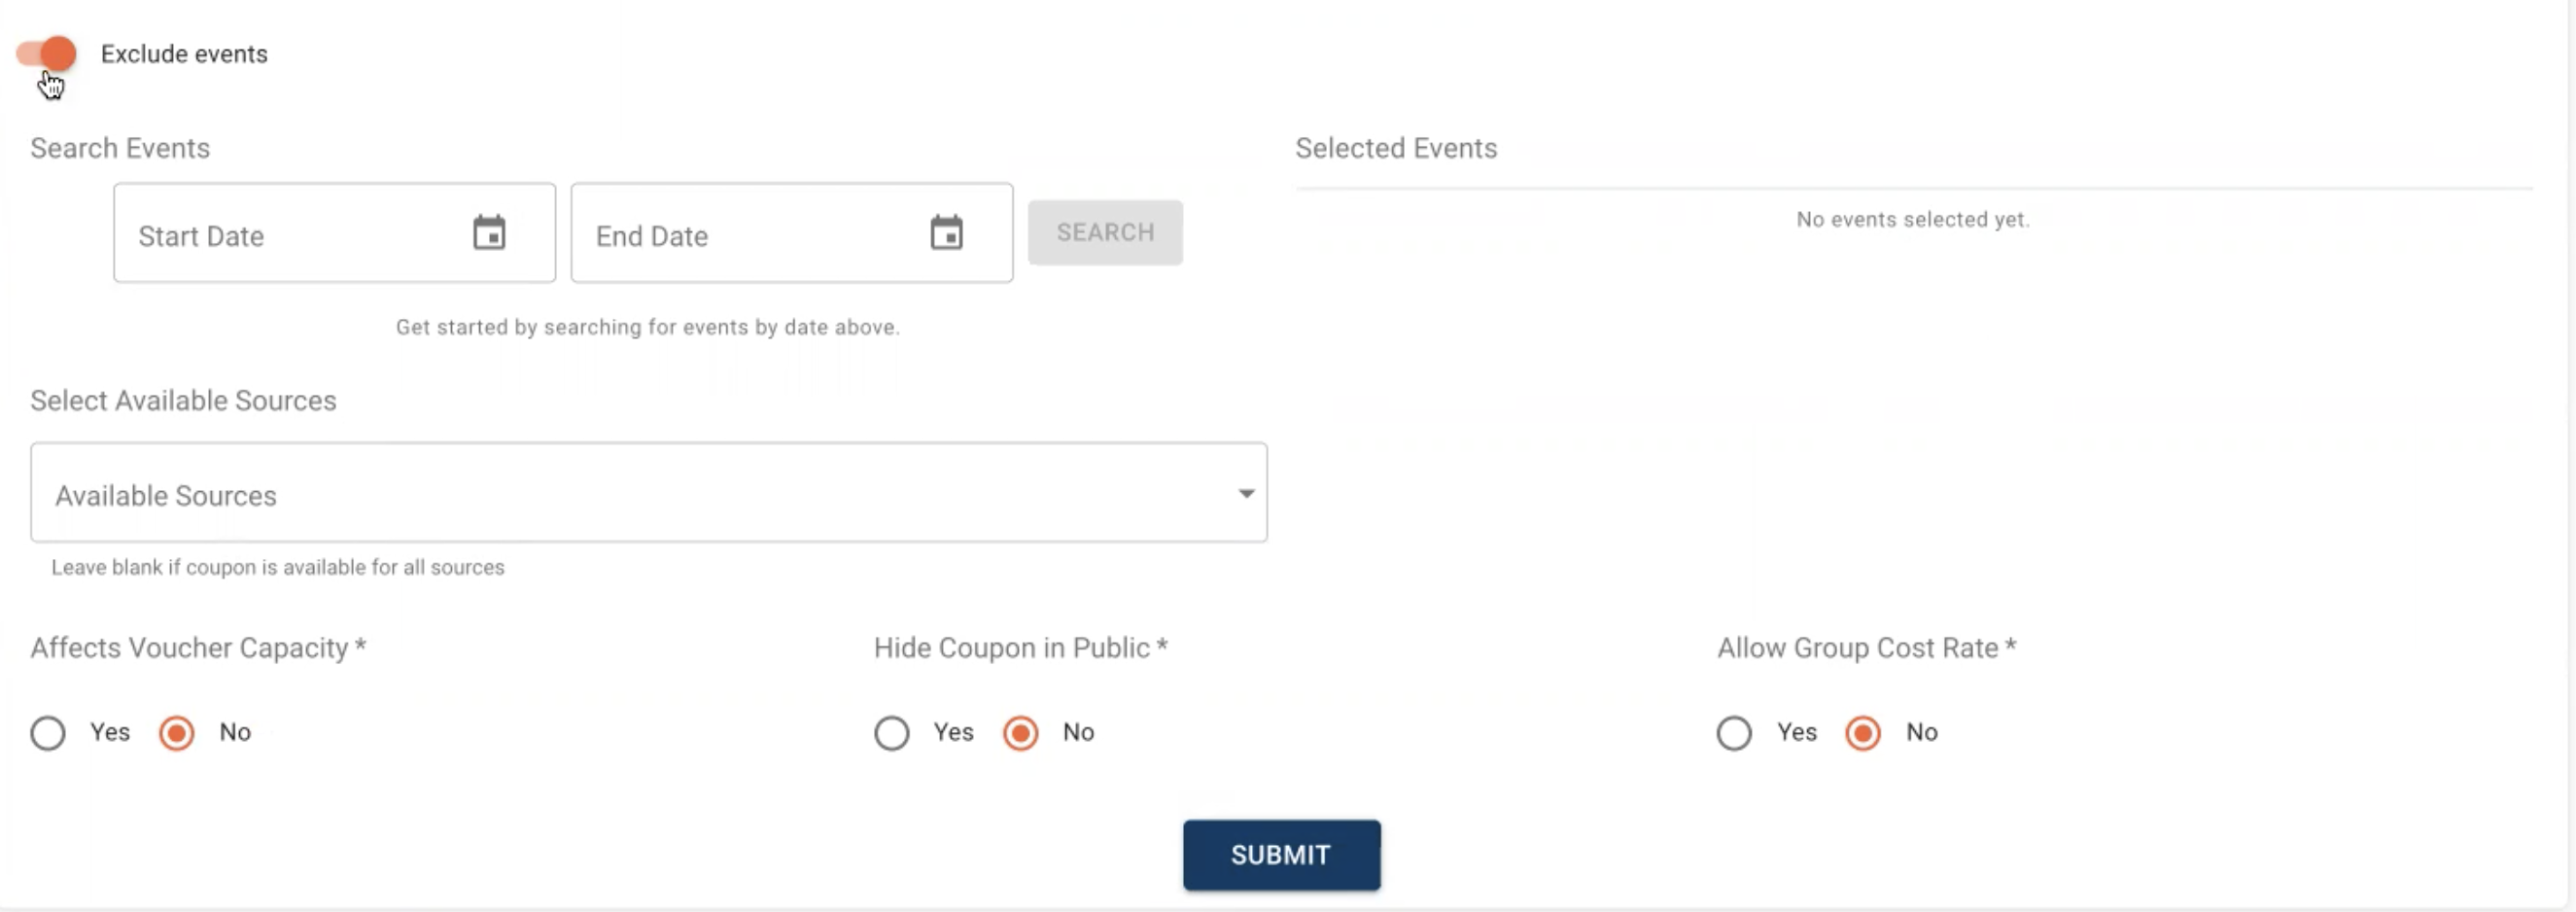
If you want your coupon code to apply to most of your regular Experiences, but you have some special events that you want to exclude. You also have the option to Exclude Events using the same settings above.
-
Select Available Sources if you want to limit where this code can be used. Leave this blank if you want it to be available on all channels.

-
Affect Voucher Capacity – This is based on another feature with Capacities by Booking Channel. Leave as default of “NO” unless this is setup for your property and desired for this coupon.
-
Hide Coupon in Public – This option can hide the promo code used on the booking in the receipt/confirmation
-
For most of your external / public offers, this can remain as “NO” as they will generally already have this code.
-
For internal-use only codes, it is recommended to indicate “YES” to hide the actual promo code from the guests view.
-
When you select this option, you will have the option to put in a different label that will be displayed to the customer, that tells them why they got the discount.
-
-

-
Allow Group Cost Rate – YES will allow this discount to be applied to tickets when checking out on a Group Cost Rate. NO will prompt an error if attempting to use this cost rate when checking out as a “Group”

-
SUBMIT
HOW TO GENERATE THE UNIQUE CODES:
Once you hit submit its going to pop up a Success box and a Filed to “Enter number of coupon codes you want to generate below” this is asking you how many unique coupon codes you want to create (You will be able to create more in the future as well)
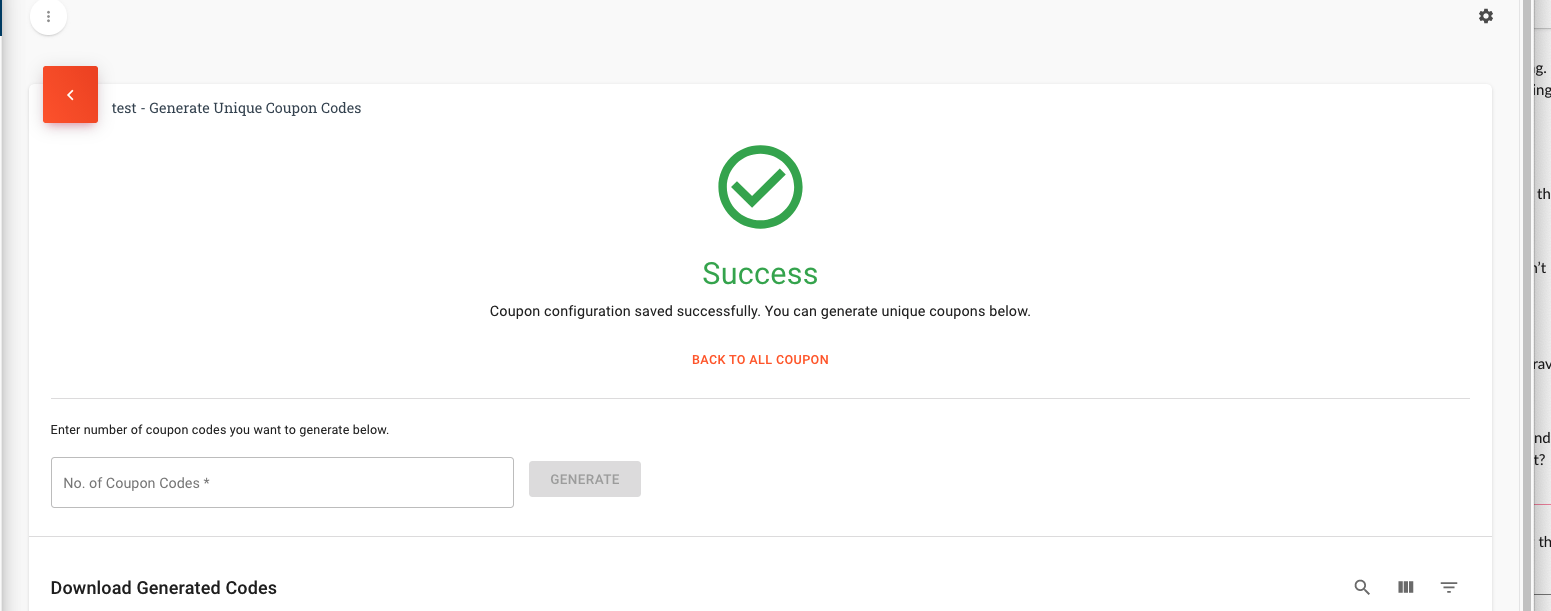
Each request for codes will show below in downloadable CSV files. Each row shows you the quantity of codes requested, when and by who, along with the ability to Download the CSV file.

Download Generated Codes – Use this icon of the cloud with the arrow to download your codes. Once you download the file you will notice that the codes are all begin with the prefix you created under the coupon setup + random & Non-sequential unique codes. This Entire code, including the prefix should be entered at checkout.
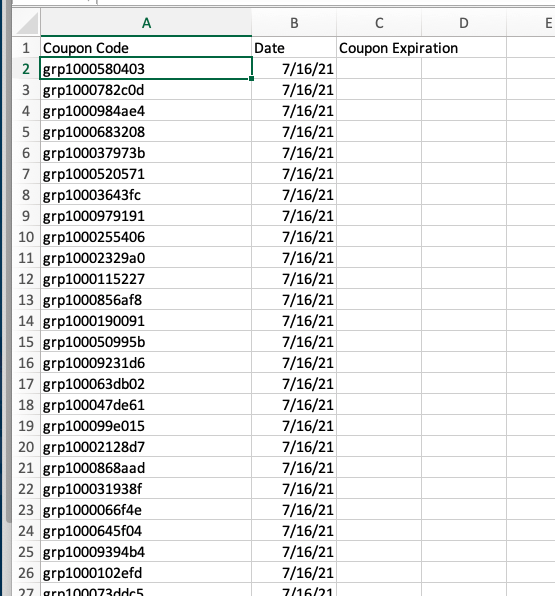
You can now use this file to send individual codes out to clients as needed, or send this file to whoever you need to so they can start using the codes. Be sure you do not give the same code twice as these are unique and only able to be redeemed once
If you need to pull more tickets for this Unique Codes, you don’t need to create a new coupon code, you can go back into your Coupons and generate more codes: